
Nevermind Docker Desktop, Here is Podman
26 May 2022
Background
UPDATE (28/05/2022): *Podman covers most of Docker functionality, however I found that image layer caching is currently missing. One solution is using Podman coupled with buildkit.
Docker changed its license terms in August 2021. That means it is no longer possible to use Docker Desktop in a commercial setting without purchasing a license.
While it is possible to request a license for it, a great open source alternative is to use Podman.
 TLDR from their website: “Podman is a daemonless container engine for developing, managing, and running OCI Containers on your Linux System. Containers can either be run as root or in rootless mode. Simply put: alias docker=podman. More details here.”
How to install it and run it
On a macOS it’s pretty easy:
brew install podman
Once it’s installed, you need to create a virtual machine. This can be done by running:
podman machine init
This should have created a virtual machine which will be used as our backend for everything Podman related. Let’s go on and start our virtual machine with:
podman machine start
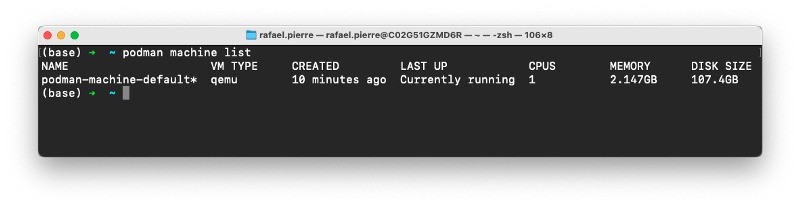
Our virtual machine should be running & ready to use. We can double check by running:
podman machine list
Usage
The Podman CLI uses the same conventions and parameters as Docker’s, which is pretty neat. You can even create an alias for it, so that you can fire it up using the good and old docker command. Just add the following to your .bash_profile (or.zshrc, if you use ZShell):
alias docker=podman
And you’re done. You can test it quite easily by pulling an image:
docker pull busybox
Troubleshooting
Unable to start host networking
It could be that you come across this error when trying to start Podman’s VM (podman machine start):
Error: unable to start host networking: “could not find \”gvproxy\” in one of [/usr/local/opt/podman/libexec /opt/homebrew/bin /opt/homebrew/opt/podman/libexec 3/usr/local/bin /usr/local/libexec/podman /usr/local/lib/podman /usr/libexec/podman 4/usr/lib/podman]”
To solve that, from a terminal window run:
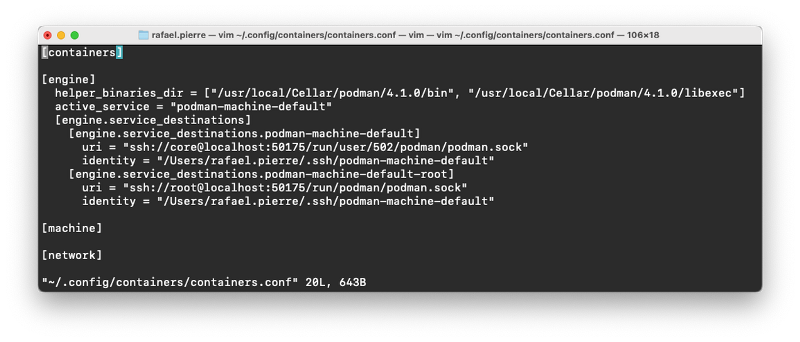
vim ~/.config/containers/containers.conf
In the engine section, add the following line (replace 4.1.0 with your version if needed):
helper\_binaries\_dir=[“/usr/local/Cellar/podman/4.1.0/bin”,”/usr/local/Cellar/podman/4.1.0/libexec”]
Your final containers.conf file should look like this:
QEMU
QEMU is a virtualization engine for Mac. Depending on your environment, you might also need to install it. Easy to do it with brew:
brew install qemu
Now you should be good to go 😄
Podman Compose
You might be asking: what about Docker Compose? Well, I’ve got some good news for you: there’s Podman Compose!
To install it:
pip3 install podman-compose
You can run it in the same way as Docker Compose. From a directory containing your docker-compose.yaml, simply run:
podman-compose up
Needless to say — you could also create an alias for it:
alias docker-compose=podman-compose
Bonus: Using Podman to Migrate from Docker Compose to Kubernetes
One challenge with Docker Compose is that the YAML file format only works with the Docker engine. While you can give it to other Docker users for local replication, they cannot use it with other container runtimes. That is, until now.
There’s a nice bonus with Podman: you can use it to convert package the containers that you have previously spun up with Docker Compose to Kubernetes YAML Manifests.
To do so, simply run:
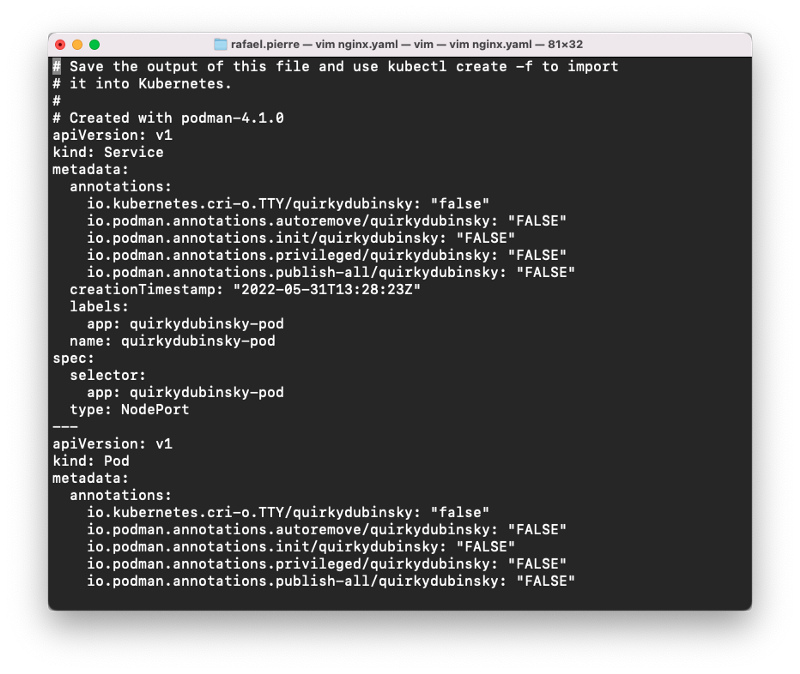
podman generate kube -s -f manifest_name.yaml CONTAINER_ID
As a result, you will get something like this:
You might also like
- Keeping Your Machine Learning Models on the Right Track: Getting Started with MLflow, Part 2
Learn how to use MLflow Model Registry to track, register and deploy Machine Learning Models effectively.mlopshowto.com - Keeping Your Machine Learning Models on the Right Track: Getting Started with MLflow, Part 1
Learn why Model Tracking and MLflow are critical for a successful machine learning projectmlopshowto.com - What are Feature Stores and Why Are They Critical For Scaling Machine Learning
Understand why Feature Stores are critical for a good MLOps foundationmlopshowto.com
Reference
- How Podman runs on Macs and other container FAQs
As the Podman machine function becomes more used-particularly on Macs-there have been many questions about how this all…www.redhat.com - Dockerless containers with Podman on MacOS
Docker the company has been throwing wrenches lately into what used to be a smooth user experience with their new Terms…awstip.com