
An Apache Airflow MVP: Complete Guide for a Basic Production Installation Using LocalExecutor
30 Aug 2020 An Apache Airflow Pipeline. Souce: Unsplash### Recap
In the first post of our series, we learned a bit about Apache Airflow and how it can help us build not only Data Engineering & ETL pipelines, but also other types of relevant workflows within advanced analytics, such as MLOps workloads.
We skimmed briefly through some of its building blocks, namely Sensors, Operators, Hooks and Executors. These components provide the basic foundation for working with Apache Airflow. Back then, we worked with the SequentialExecutor, the simplest possible Airflow setup. Having support for running only one task at a time, it is used mainly for simple demonstrations. That is obviously not enough for production scenarios, where we might want to have many tasks and workflows being executed in parallel.
As we already discussed, Apache Airflow ships with support for multiple types of Executors — each of them is more suited to a particular type of scenario.
- LocalExecutor unleashes more possibilities by allowing multiple parallel tasks and/or DAGs. This is achieved by leveraging a full fledged RDBMS for the job metadata database, which can be built on top of a PostgreSql or MySQL database. While you can definitely run some light production workloads using LocalExecutor, for scaling up you would have to resort with vertical scaling by beefing up the hardware resources of your environment.
- CeleryExecutor addresses this limitation: it unlocks the possibility of scaling the setup horizontally by allowing you to create a processing cluster with multiple machines. Each machine spins up one or more Celery Workers in order to split Airflow’s workload. Communication between workers and the Scheduler is performed through a message broker interface (can be implemented using Redis or RabbitMQ). Having said that, you must define the number of workers beforehand and set it up in Airflow’s configuration, which can make the setup a bit static.
- DaskExecutor works in a similar way as CeleryExecutor, but instead of Celery, it leverages the Dask framework for achieving distributed computing capabilities.
- More recently, KubernetesExecutor has become available as an option to scale an Apache Airflow setup. It allows you to deploy Airflow to a Kubernetes cluster. The capability of spinning Kubernetes Pods up and down comes out of the box. You will want to use such setup if you would like to add more scale to your setup, in a more flexible and dynamic manner. However, that comes at the expense of managing a Kubernetes cluster.
An Apache Airflow MVP
When starting up a data team or capability, evaluating cost versus benefit as well as complexity versus added value is a critical, time consuming, daunting task. Agile organizations and startups usually work with prototypes to tackle such scenario — sometimes working products are better at answering questions than people.
 Inspired by this philosophy, we will create a basic, hypothetical setup for an Apache Airflow production environment. We will have a walkthrough on how to deploy such an environment using the LocalExecutor, one of the possible Apache Airflow task mechanisms.
For a production prototype, choosing LocalExecutor is justified by the following reasons:
- Provides parallel processing capabilities
- Only one computing node — less maintenance & operations overhead
- No need for Message Brokers
LocalExecutor
You might be asking — how is that possible? Well, as the name indicates, when we use the LocalExecutor we are basically running all Airflow components from the same physical environment. When we look at the Apache Airflow architecture, this is what we are talking about:
 Main Airflow Components for a LocalExecutor Setup. Source: AuthorWe have multiple OS processes running the Web Server, Scheduler and Workers. We can think of LocalExecutor in abstract terms as the layer that makes the interface between the Scheduler and the Workers. Its function is basically spinning up Workers in order to execute the tasks from Airflow DAGs, while monitoring its status and completion.
Getting The Wheels Turning
We had a conceptual introduction on LocalExecutor. Without further ado, let’s setup our environment. Our work will revolve around the following:
- Postgresql Installation and Configuration
- Apache Airflow Installation
- Apache Airflow Configuration
- Testing
- Setting up Airflow to run as a Service
These steps were tested with Ubuntu 18.04 LTS, but they should work with any Debian based Linux distro. Here we assume that you already have Python 3.6+ configured. If that’s not the case, please refer to this post.
Note: you could also use a managed instance of PostgreSql, such as Azure Database for PostgreSql or Amazon RDS for PostgreSql, for instance. This is in fact recommended for a production setup, since that would remove maintenance and backup burden.
1. Postgresql Installation and Configuration
To install PostgreSql we can simply run the following in our prompt:
sudo apt-get install postgresql postgresql-contrib
In a few seconds, PostgreSql should be installed.
Next, we need to set it up. First step is creating a psql object:
sudo -u postgres psql
We proceed to setting up the required user, database and permissions:
postgres=# CREATE USER airflow PASSWORD 'airflow'; #you might wanna change this
CREATE ROLE
postgres=# CREATE DATABASE airflow;
CREATE DATABASE
postgres=# GRANT ALL PRIVILEGES ON ALL TABLES IN SCHEMA public TO airflow;
GRANT
Finally, we need to install libpq-dev for enabling us to implement a PostgreSql client:
sudo apt install libpq-dev
Optional Step 1: you can make your setup more secure by restricting the connections to your database only to the local machine. To do this, you need to change the IP addresses in the pg_hba.conf file:
sudo vim /etc/postgresql/12/main/pg\_hba.conf
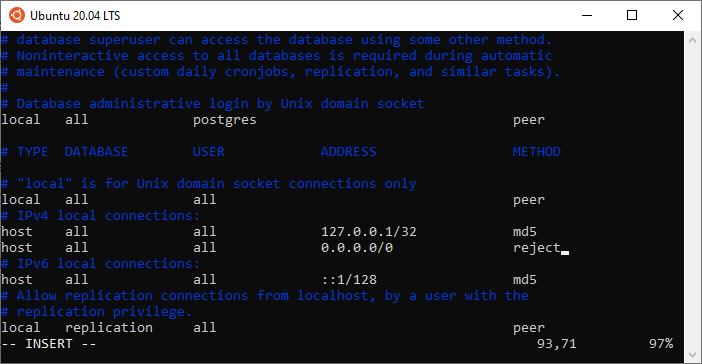 PostgreSql Configurations (pg_hba.conf)Optional Step 2: you might want to configure PostgreSql to start automatically whenever you boot. To do this:
sudo update-rc.d postgresql enable
2. Apache Airflow Installation
We will install Airflow and its dependencies using pip:
pip install apache-airflow['postgresql']
pip install psycopg2
By now you should have Airflow installed. By default, Airflow gets installed to ~/.local/bin. Remember to run the following command:
export PATH=$PATH:/home/your_user/.local/bin/
This is required so that the system knows where to locate Airflow’s binary.
Note: for this example we are not using virtualenv or Pipenv, but you can feel free to use it. Just make sure that environment dependencies are properly mapped when you setup Airflow to run as a service :)
3. Apache Airflow Configuration
Now we need to configure Airflow to use LocalExecutor and to use our PostgreSql database.
Go to Airflow’s installation directory and edit airflow.cfg.
vim airflow.cfg
Make sure that the executor parameter is set to LocalExecutor and SqlAlchemy connection string is set accordingly:
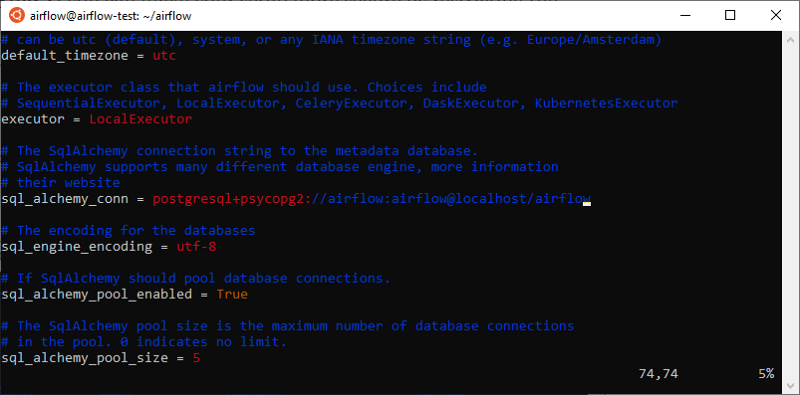 Airflow configuration for LocalExecutorFinally, we need to initialize our database:
airflow initdb
Make sure that no error messages were displayed as part of initdb’s output.
4. Testing
It is time to check if Airflow is properly working. To do that, we spin up the Scheduler and the Webserver:
airflow scheduler
airflow webserver
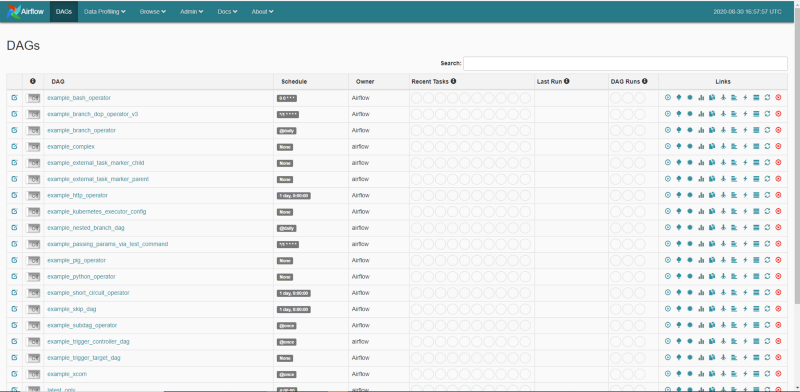
Once you fire up your browser and point to your machine’s IP, you should see a fresh Airflow installation:
 #### 5. Setting up Airflow to Run as a Service
Our last step is to configure the daemon for the Scheduler and the Webserver services. This is required so that we ensure that Airflow gets automatically restarted in case there is a failure, or after our machine is rebooted.
As an initial step, we need to configure Gunicorn. Since by default it is not installed globally, we need to create a symbolic link for it.
sudo ln -fs $(which gunicorn) /bin/gunicorn
Next, we create service files for Webserver and Scheduler:
sudo touch /etc/systemd/system/airflow-webserver.service
sudo touch /etc/systemd/system/airflow-scheduler.service
Our airflow-webserver.service must look like the following:
#
# Licensed to the Apache Software Foundation (ASF) under one
# or more contributor license agreements. See the NOTICE file
# distributed with this work for additional information
# regarding copyright ownership. The ASF licenses this file
# to you under the Apache License, Version 2.0 (the
# “License”); you may not use this file except in compliance
# with the License. You may obtain a copy of the License at
#
# <http://www.apache.org/licenses/LICENSE-2.0>
#
# Unless required by applicable law or agreed to in writing,
# software distributed under the License is distributed on an
# “AS IS” BASIS, WITHOUT WARRANTIES OR CONDITIONS OF ANY
# KIND, either express or implied. See the License for the
# specific language governing permissions and limitations
# under the License.
[Unit]
Description=Airflow webserver daemon
After=network.target postgresql.service mysql.service
Wants=postgresql.service mysql.service
[Service]
EnvironmentFile=/etc/environment
User=airflow
Group=airflow
Type=simple
ExecStart= /home/airflow/.local/bin/airflow webserver
Restart=on-failure
RestartSec=5s
PrivateTmp=true
[Install]
WantedBy=multi-user.target
Similarly, we add the following content to airflow-scheduler.service:
#
# Licensed to the Apache Software Foundation (ASF) under one
# or more contributor license agreements. See the NOTICE file
# distributed with this work for additional information
# regarding copyright ownership. The ASF licenses this file
# to you under the Apache License, Version 2.0 (the
# “License”); you may not use this file except in compliance
# with the License. You may obtain a copy of the License at
#
# <http://www.apache.org/licenses/LICENSE-2.0>
#
# Unless required by applicable law or agreed to in writing,
# software distributed under the License is distributed on an
# “AS IS” BASIS, WITHOUT WARRANTIES OR CONDITIONS OF ANY
# KIND, either express or implied. See the License for the
# specific language governing permissions and limitations
# under the License.
[Unit]
Description=Airflow scheduler daemon
After=network.target postgresql.service mysql.service
Wants=postgresql.service mysql.service
[Service]
EnvironmentFile=/etc/environment
User=airflow
Group=airflow
Type=simple
ExecStart=/home/airflow/.local/bin/airflow scheduler
Restart=always
RestartSec=5s
[Install]
WantedBy=multi-user.target
Note: depending on the directory where you installed Airflow, your ExecStart variable might need to be changed.
Now we just need to reload our system daemon, enable and start our services:
sudo systemctl daemon-reload
sudo systemctl enable airflow-scheduler.service
sudo systemctl start airflow-scheduler.service
sudo systemctl enable airflow-webserver.service
sudo systemctl start airflow-webserver.service
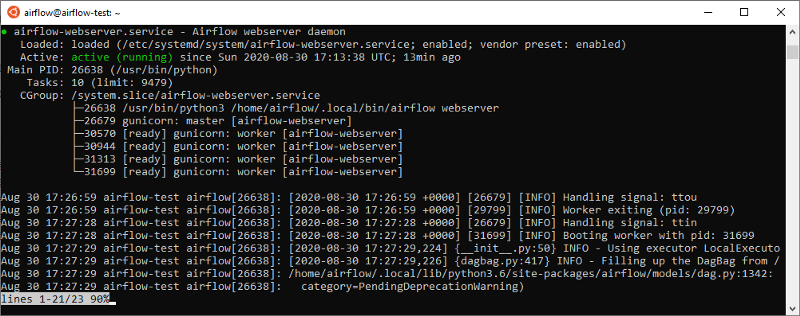
Our services should have been started successfully. To confirm that:
$ sudo systemctl status airflow-webserver.service
$ sudo systemctl status airflow-scheduler.service
You should see some output stating that both services are active and enabled. For example, for the Webserver, you should see something similar to this:
 That’s it. Now you have a basic Production setup for Apache Airflow using the LocalExecutor, which allows you to run DAGs containing parallel tasks and/or run multiple DAGs at the same time. This is definitely a must-have for any kind of serious use case — which I also plan on showcasing on a future post.
Of course, there are many possible improvements here:
- The most obvious one would be to automate these steps by creating a CICD pipeline with an Ansible runbook, for instance
- Using more secure PostgreSql credentials for Airflow and storing them in a more secure manner. We could store them as a secret variable within a CICD pipeline and set them up as environment variables, instead of storing in airflow.cfg
- Restricting permissions for Airflow users in both OS and PostgreSql
But for now, we will leave these steps for a future article.
I’m glad that you made it until here and I hope you found it useful. Check out my other articles:
Keeping Your Machine Learning Models on the Right Track: Getting Started with MLflow, Part 2
Learn how to use MLflow Model Registry to track, register and deploy Machine Learning Models effectively.mlopshowto.comKeeping Your Machine Learning Models on the Right Track: Getting Started with MLflow, Part 1
Learn why Model Tracking and MLflow are critical for a successful machine learning projectmlopshowto.comA Journey Into Machine Learning Observability with Prometheus and Grafana, Part I
Deploying Prometheus and Grafana on Kubernetes in 10 minutes for basic infrastructure monitoringmlopshowto.com